
A useful 3D model has to survive more than a flattering preview. It needs to work in the scene, application or physical process for which it was created. N4D lets creators generate 3D models from text and images, giving them a starting point they can inspect against those practical requirements.
For someone trying an AI 3D model generator, the first question is what the result needs to do. A background object in a still image, a game prop seen from several angles and a part intended for printing need different checks. Defining that purpose early makes it easier to decide which details deserve attention and when a model is ready to move forward.
Contents
- 1 Define the job before judging the model
- 2 Rotate beyond the preview angle
- 3 Inspect the shape without its surface finish
- 4 Check scale in the destination scene
- 5 Test materials and responsiveness together
- 6 Reopen the exported file before handing it over
- 7 Give physical objects a separate review
- 8 Keep the first acceptance test small
Define the job before judging the model
Write a short acceptance brief before generating variations. It might say that a desk lamp must look convincing in a room render, remain recognizable from the side and fit beside a laptop. That is a more useful test than asking whether the model looks impressive in isolation.
Include the viewing distance and the expected interaction. A decorative object seen across a room may need less detail than an object held near the camera. If a lid must open or a handle must move, record that requirement explicitly. A convincing exterior does not establish that the necessary pieces are separated or arranged for motion.
Rotate beyond the preview angle
Inspect the front, sides, back and underside. With a reference image, some surfaces may be hidden from view, so the generated result needs particular attention in those areas. Look for unexpected protrusions, fused parts, uneven proportions and details that change character as the object turns.
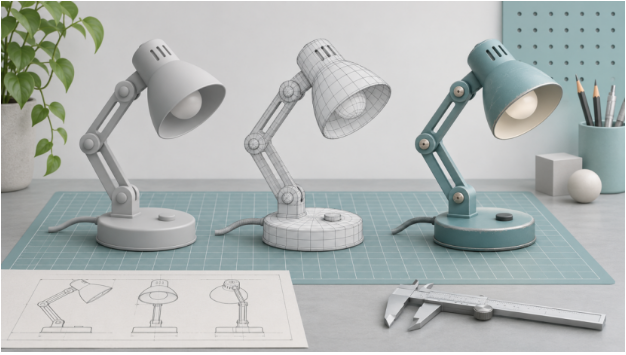
For the lamp example, check the connection between the shade and arm, the shape of the base and the space beneath the shade. A dark patch in a preview could be a surface feature, a shadow or an opening. Changing the view and lighting helps establish what is actually present.
Inspect the shape without its surface finish
Textures and lighting can make an object feel detailed before its structure has been examined. View the model with a simple neutral material, then inspect its wireframe if your 3D application provides that view. The wireframe shows the edges and faces that make up the mesh.
Look for loose fragments, unexpected holes and surfaces that pass through one another. Also examine abrupt shading changes, which may require a closer look at surface orientation or geometry. Keep an untouched copy before making repairs. Broad cleanup operations can remove intentional detail as well as unwanted geometry.
The amount of cleanup depends on the job. A static visual prop and an object that will deform during animation place different demands on the mesh. Ask an experienced modeler to assess a complex asset if its intended use goes beyond what you can confidently inspect.
Check scale in the destination scene
Place the model beside something with a known size. A lamp may appear well proportioned by itself but look oversized beside a desk or too small next to a chair. Confirm the dimensions after import, including the unit settings used by the receiving application.
Check orientation and the point around which the object rotates. For a lamp that sits on a surface, the base should meet the desk cleanly. For a movable prop, a convenient rotation point can make placement easier. These checks are more informative inside the actual scene than in a separate asset preview.
Test materials and responsiveness together
Open the model in the software where it will be used and confirm that its surface appearance arrives as expected. Check for missing image files, misplaced detail and visible seams. Examine reflective or transparent areas under the lighting planned for the project, since a material that works in one environment may need adjustment in another.
Then test the scene with a realistic number of objects. One detailed prop may be comfortable to work with while many copies make navigation or loading slower. Choose a level of detail that serves the intended view, and evaluate the result again after any simplification. There is no single polygon count that fits every project.
Reopen the exported file before handing it over
Treat export as a handoff that needs its own check. Choose a format supported by the receiving application and verify which materials or other asset information it carries. Reopen the exported file in a fresh scene rather than assuming the original preview proves that everything transferred.
For a small team, the handoff note can be brief: intended use, dimensions, chosen file format and any remaining edits. Save associated texture files with the model where the format requires them. A colleague should be able to understand what the asset is and what has already been checked without reconstructing the generation process.
Give physical objects a separate review
A model approved for a digital illustration still needs a different review before printing or manufacturing. For printing, inspect the mesh in the intended preparation software and check features such as wall thickness, supports and contact with the build surface. Use settings appropriate to the chosen process and material.
A generated visual concept also does not establish engineering tolerances, load capacity or safe mechanical operation. If the object has a functional role, those requirements need the appropriate design and validation work. Keeping this distinction clear prevents a promising shape from being mistaken for an approved physical design.
Keep the first acceptance test small
Start with one representative object and take it through the complete route: generation, inspection, export and use in the destination scene. Record the issues that actually affect the result. That gives the next iteration a concrete purpose, such as improving a silhouette or simplifying an unseen area.
N4D can provide the initial model from an image or written idea. A focused acceptance check helps turn that starting point into an asset with a clear role, known limitations and a practical next step for the project.